

Changing out your old incandescent exterior lighting with new LEDs is not only a more efficient solution but can add a facelift to your older rig. There are many benefits to doing this:
- Replace old, defective fixtures.
- Increase the efficiency of your electrical system.
- LED bulbs are much more rugged and have a much longer lifespan than incandescent.
- Newer fixtures typically look better than the older versions.
Each rig has different requirements for their external lighting, but you can easily shop amazon.com or other sources for attractive replacements. In many cases, you can find an exact replacement type that will look much like the factory versions.
It is important to note that in many cases you cannot simply replace the old lights with LEDs. The blinker/signal circuitry may not be able to handle the more efficient lighting properly. Specifically, your blinkers/flashers may blink much faster (or not at all) once you replace the lights. More on this below.
Marker Lights
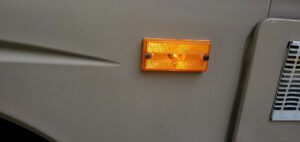 The red and yellow lights on the sides of your rig are called marker lights. They help others see your rig as well as give you an observable reference when you maneuver your vehicle at night to park. In many cases these are extremely cheap, reflective plastic bezels covering a single incandescent bulb (like old flashlight bulbs). They routinely get moisture in them and the bulbs lose connectivity with the poorly manufactured sockets if they do not burn out on their own. Additionally, the wiring is, in many cases, simply dangling behind the wall of the rig and are very easily dropped where you must try to fish the wire back through the little hole.
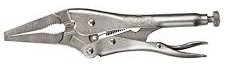
I suggest you use something like a long nose vise grip (pictured) to clamp the wire on the outside of your rig and keep it from falling in until you have a chance to cut and splice the new light in place.
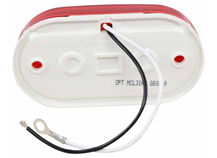
Marker lights typically come similar to that shown below. Two wires will protrude from the back of the fixture. It is important to note that you absolutely must connect the wires properly when splicing them to the old wires and do not trust black-to-black, white-to-white. The manufacturer did not necessarily care about polarity when they ran these wires so the positive wire can be either black or white. Incandescent bulbs do not care which way they are wired whereby LEDs absolutely must be wired correctly. I suggest you turn the lights on and test as you temporarily connect the wires until you are certain you have the correct combination. These are 12 volt systems and cannot shock you (unless you put the wires in your mouth; and if you do that you probably can’t read this anyhow).
 There are several splicing solutions out there from simply twisting and covering with tape to using wire nuts. Keep in mind that this is a vehicle, and it will be bouncing and bumping down the road when you drive it so you might want to use a more permanent solution such as wire crimping or soldering.
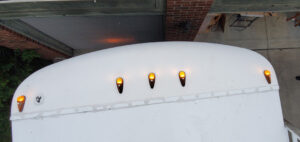
Cab Lights
 LED cab lights are another great upgrade. These too are notoriously cheap and prone to leaking and failing. There are some wonderful replacements out there that can really improve the look of your rig at night.
Unfortunately, the manufacturer tends to leave nearly zero slack in the wires so dropping newly cut wires into the top of your rig is a real danger. Use the vise grip method above and be very, very careful. Once you have replaced these, you will really like the results!
Tail Lights
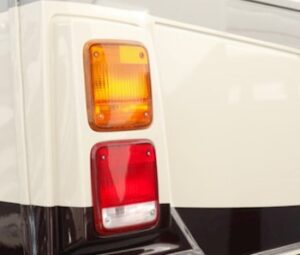
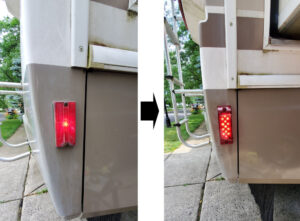
Depending on your model, the tail lights on your rig will look similar to these. They do not require a complete replacement since the bezel (cover) is pretty basic and last pretty long. If you see cracks or other issues you can, of course, replace them.
Behind the bezels are simple incandescent bulbs similar to the marker/signal bulbs. These can be replaced with LED replacements such as the ones shown below.
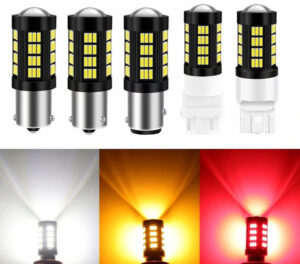
Look at the old bulb and determine if it is a single or double filament so you can order the correct LED replacement. Once again, keep in mind that polarity matters and if the sockets are not wired properly the bulbs will not work. Most likely, if this is the case, you’ll need to cut the wires and splice them together again in reverse order.
Flashing Issues
This section is a bit more technical so hold on tight…
The circuitry to actually flash your blinkers/signals varies from model to model and year to year. If your blinkers are not controlled by an electronic circuit (very new rigs), they are probably controlled by way of a thermal relay. These require that a certain “load” exists when the lights are on. This is acquired by way of the incandescent bulbs being powered on. Once current is fed through the bulbs, there is a mechanical switch that heats up and “snaps” off once it gets warm enough. At that point power is removed from the circuit and the switch cools and snaps back to on and the cycle repeats.
LED bulbs have a much lower current need so these mechanical switches may not function properly or at all. What typically happens is they blink very rapidly. There are a couple ways of fixing this:
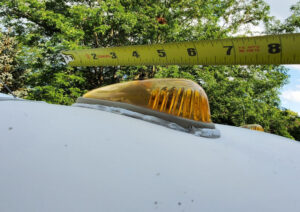
Load Resistor
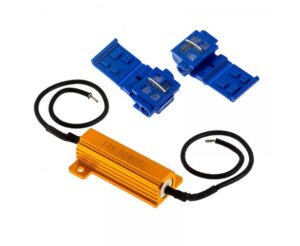 This is a common solution to the problem of changing to LEDs. The resistor (the gold device) adds load to the circuit to simulate what it would be if you still had your incandescent bulbs still installed. There are some problems with this solution:
• The resistor will get very very hot so you need to mount it somewhere that will not melt anything
• You lose the benefit of a very light load on your flasher circuit
• It still may not work
Replace your Flasher
If you can find it, I believe replacing your actual flasher relay with an electronic version is a much more reliable solution. It eliminates the mechanical aspect of the circuit.
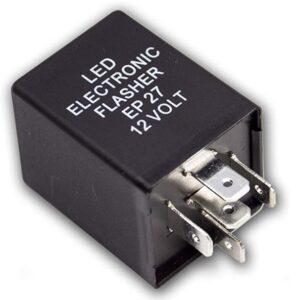
I say “if you can find it” because these can be located in a variety of places including, but not limited to, your fuse panel. Mine was by itself on the floor behind the brake peddle and was a bugger to locate. Unfortunately, it is nearly impossible to get an exact response from the manufacturer as to its location and I just happened to stumble on it.
 Locating this is much easier if you start here and listen for the clicking when you turn your signals on.
The above photo of the electronic flasher may or may not be compatible with your vehicle. I suggest you find your current one, remove it, and take it to an auto parts store for an electronic version.
I hope you find this article of use when you replace your lighting. Don’t hesitate to contact me if you have any questions!
4 comments
This article states white LED lights are OK for use behind coloured lenses. I disagree: in my experience with LED light conversion on my motorcycle tail/brake lights (where brightness is important!) I discovered that the colour of the bulb must match the colour of the lens. I suspect it has to do with the difference between LED and incandescent light. A white LED behind a red lens results in much lower light intensity compared to a red LED behind a red lens using the same wattage/lumen rating.
Another tip to being seen from the back is to clean the reflective surface behind the bulb. Mine wouldn’t clean up very well so I simply used that shiny heating duct metal tape. And don’t forget about your dolly and toad!
Stay safe!
The white behind red is a matter of choice. Myself, I used red behind red and yellow behind yellow but white should be ok as the direct LED replacements for those bulbs were that color.
Jon, those lights look awesome. Where do you find these lights? Amazon?
Yes, Amazon, although I got the electronic blinker from the local auto store.