
")
When we bought our 2007 Bounder 38P, the awning was missing. It must have met an untimely demise as only the front arm was there, the rear arm and most of the j-channel rail that held the awning edge was also gone!
The original awning according to the nice folks at REV was an manual A&E but it was long since discontinued. If you have been down this path, you know that in that era, if you have a slide-out on the passenger side, the slide out uses the j-channel / drip rail where the top of the wall meets the roof and another j-channel was mounted up on top of the roof for the sun shade / awning. For the awning arms to clear the j-channel at the top of wall, a 1.5″ x 3 extrusion was first screwed into the side of the coach, and then a bracket was installed over the curved surface of the roof above that rail to get the top of awning to be about 6″ higher so it would make it over the slide-out when extended.
I looked around for a few months for parts to restore it as the factory intended, but availability and costs made me come up with another solution. I ended up deciding I was going to go with an electric Lippert Solera XL awning. The Solera XL has a 10′ reach vs the standard 8′, which is nice if your first 2 feet so shade is consumed by the slide-out.
I knew going in that there would be two challenges. 1) mounting the new arms with a drip rail in the way 2) modifying the bracket on the roof 3) getting an awning in/out switch installed as the coach didn’t come with it.
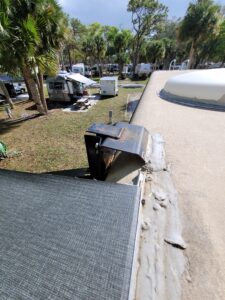
First things first, I installed a new j-channel on the roof. I had to start by cleaning off the remainder of the piece that was ripped off. Simply remove the screws and then very slowly with two putty knives, pry up the old j-channel. Use one putty knife to hold down the roof fabric and the other to slide under the channel. Be careful not to tear the roof fabric, that is the most important thing. Then, put on a rubber glove and use your thumb and rub the dicor sealant, it will ball up as you rub it and then you can lift it off. I ended up with a tennis ball size lump of dicor by the time I was done. Clean the area lightly with a little acetone, let it dry, and then apply a liberal line of new dicor down on the roof where the j-channel will go, and screw it down. I used #10 x 1.25″ sheet metal screws. The roof frame is about 3″ wide in that area, so there is plenty of room for a bit of error. After its screwed in place, apply dicor to the edges and cover all the screws and let it dry for at least a day before proceeding. This step took me about 2 hrs total.
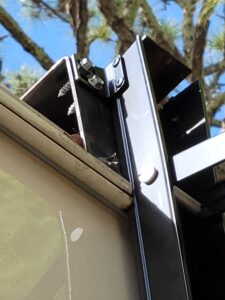
Next up you need to modify the roof brackets and the side-wall j-channel to allow the new awning arms to be relatively flush with the wall. I used a cut off wheel in a battery powered drill. It took me about 3 disks per side and a few charges of the battery + 2 hrs In the next picture, you can see where I notched the j-channel. You can’t really cut it out, you just notch the channel away. It gets you within 3/16″ from the sidewall which seemed to be enough without adding another place for a leak. The roof bracket just needs the tab below the top plate chopped off so the Solera arm can go all the way to the top.
At this point, you can just install the awning per the instructions making sure the arms go as far up on the roof bracket as possible. Pro-Tip: Put butyl tape under the awning arms. At a min, put the tape where the lag screws will attach to the wall, and where the wire will go inside, but ideally, more will not hurt anything.
Next, the electrical connection. I had previously done some research and acquired schematics from REV. They don’t have every old model, but they have something close. If they don’t have your coach, you will find that a similar model from the same year was likely wired the same. Also, wires for options your coach may not have, are likely buried in the wall somewhere.
I found the connector and wires for the optional electric awning behind the speaker above the passenger seat, and wires for a switch in the wall to the left as the steps as you enter the motor home ( just below the other step and light switches). The wires are all color coded and labelled on both ends which really helped. The “cap” on that wall that doubles as an end-table for the couch is just held down with RTV. Carefully pry it off to access the wires inside. You will find a routed place on the back side for the switch already there, you just need to drill a hole in the center and file the hole out to size, and screw the new switch in place.
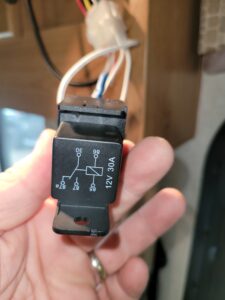
The connector in the cabinet behind the speaker is a standard 20A MLX 15 position connector. You can order a mating connector, crimp pins, and a tool from www.digikey.com for < $20. I wanted to wire in an $5 12V relay to disable the awning switch when the ignition is running, and that 15 pos connector even had a wire for that! The factory solution was a control box which is no longer available, but this solution works just as well.
Before you get it all together, you need to get the wire from outside into that cabinet behind the speaker. Measure on the wall from the door frame up to the center of the speaker and then transfer that measurement to the outside wall and drill away. Don’t forget to wrap your wires in 3/8 wire loom before you push it through the hole, it will keep it form chafing over time.
To wire this all up, here is the schematic:
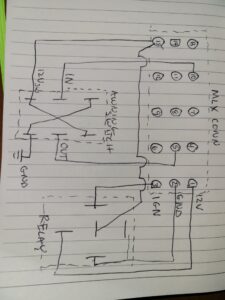
Basically, you are getting a power wire down to the switch that is “protected” with the relay from being hot when the ignition key (engine is running) and getting a ground from one of the other switches in the wall. You have two wires coming back form the switch coming back up to the MLX connector for voltage to the awning motor.
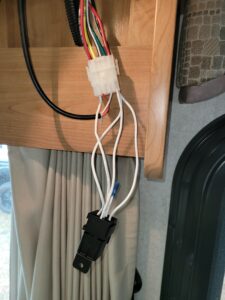
Here’s a pic of my handiwork wiring it up

When you are done, test it, and then its time to clean up. Stuff the wires back in the cabinet and re-install the speaker. Get some RTV and seal the hole from the outside where the wires came through the wall Also put a glob of RTV in the j-channel gutter rail on each side of the awning arm where you notched it in. If you don’t, every time it rains, the water will run down the awning arm vs going forward or to the rear to drain off as it should. Last but not least, RTV the wall cap back down by the door/sofa.
Then, put away your tools, extend the awning, set up a chair under the same awning, grab a beverage of choice, and bask in the glory of a well done project!
1 comment
Really cool article. I may be doing this to my 2003!