My Bounder
  • Home
  • Articles
    • View All Articles
    • Submit an Article
    • Help
  • F.A.Q.s
  • About
  • Contact
  • Resources
  • Register
  • Login

Popular Articles

Replacing/Restoring your Headlights

July 6, 2021

A Better Door Holder

May 21, 2021

Entry Step Repair and Enhancement

March 10, 2021

The Truck Wash … an RV’ers Best Kept...

April 30, 2022

Quick, Easy & Cheap Headlight Restoration

May 24, 2021

LED Exterior Lighting

February 11, 2021

Falling Cargo Doors?

February 13, 2022

Useful Accessories

March 13, 2021

Brake light switch fixed!!

December 29, 2021

Answered: Why is one black?

April 21, 2021
    Electrical

    Battery Charge/Usage Meter

    by Jon Glazer December 9, 2024
    written by Jon Glazer

    After storing my RV for two years I decided to open it up and see what might need fixed.  Right away I realized there was a problem because:

    1. The steps did not extend when I opened the door
    2. The slide-outs did not work even after I got the engine started

    #1 was due to the chassis battery being totally dead.  Easily fixed and necessary so I could start the dang thing.

    #2 was due to there being no charge on the house batteries.  Here’s some news: you need the house batteries to extend or retract the slides even if the engine is running.  There is not enough amperage in the converter to do this.

    So thus began my quest to get more information more readily than “dang the button doesn’t do anything when I press it”.

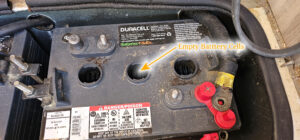
    Keep em filled

    Empty Battery Cell

    Empty Battery Cell

    First off, I came to realize that my house batteries were nearly dry.  These are not “sealed” batteries and need to have distilled water added now and then to keep them charged.  No amount of charging will solve this.  Although they may read 12+v for a short time after charging, it quickly dissipates.   It’s a whole chemistry thing I don’t want to get into here.  Just suffice it to say, keep em filled to at least over the lead plates (look inside).

    After ensuring I had the house batteries working and charging properly I started searching for some way to provide me with more information about the battery and charge statuses for both house and chassis battery.

    The Device

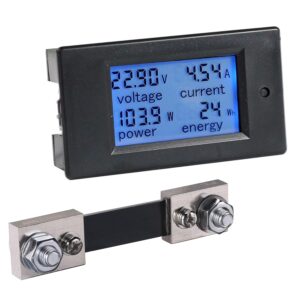
    DC Digital Multi-Function Meter

    DC Digital Multi-Function Meter

    I found this DC digital multi-function meter on Amazon™ (link here).  It shows on a nice, back-lit display the battery status as well as the amount of amps being pulled from the batteries at any one time.  This is great to ensure that things are not only charging but there is not a drain somewhere.  I purchased one for the house batteries and one for the chassis.

    Testing

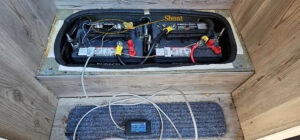
    I test-connected the device to see how it functions.  Connectivity is done by way of a four-conductor low-voltage wire.  It can be anything from 22 gauge (very thin) on up since it doesn’t really do much more than monitor.  So, as you see below, I used some random spare wire to test it out.  It is important to follow the instructions completely.  The use of the shunt is NOT intuitive but a definite necessity.

    Test Wired

    Test Wired

    This was a great way to test the re-filled batteries and ensure they retain a decent charge for a good time period.

    Final Install

    Once I was satisfied, I started thinking about a permanent installation.  I wanted the meters to be easily read and accessible from the outside without needing to go up, inside the rig.  I chose to mount them on the wall of the entryway sink cabinet.  Of course you can put yours anywhere you wish.  This is not only convenient and easy to run wires, but readable with a quick glimpse inside.

    I purchased thicker, 16 gauge 4-conductor stranded wire with a decent casing to ensure it would put up with exposure to the elements.  It will be run under the rig after all.

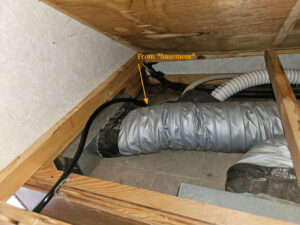
    Wiring through "Basement"

    Wiring through “Basement”

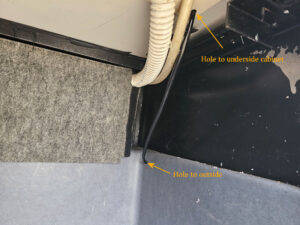
    I was able to drill a hole in the “basement” left of the stairs up to the underside of the sink cabinet as well as out to the underside of the rig.  From there it was a simple matter of routing the wire through the battery compartment housing (holes already there) and through these two holes up to the interior of the rig.

    Routing under cabinet

    Routing under cabinet

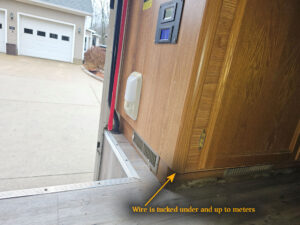
    Tucked under corner

    Tucked under corner

    I had to remove the bottom piece of wood under the cabinet to access the wire.  I found an opening in the lower corner of the cabinet that I could run the wire into and up to hole where I planned to put the meters.  All, in all, very easy to accomplish with just a little crawling around under the rig.

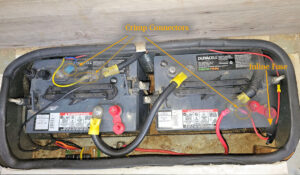
    Final Wiring

    Final Wiring

    I added an in-line fuse to the setup to ensure I don’t fry anything during install and if something gets shorted during its lifespan.  Additionally I crimped end-connectors to make installation that much more rugged and to make things easier if I ever need to replace batteries.

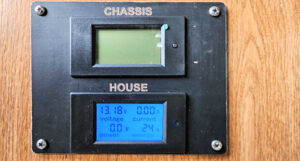
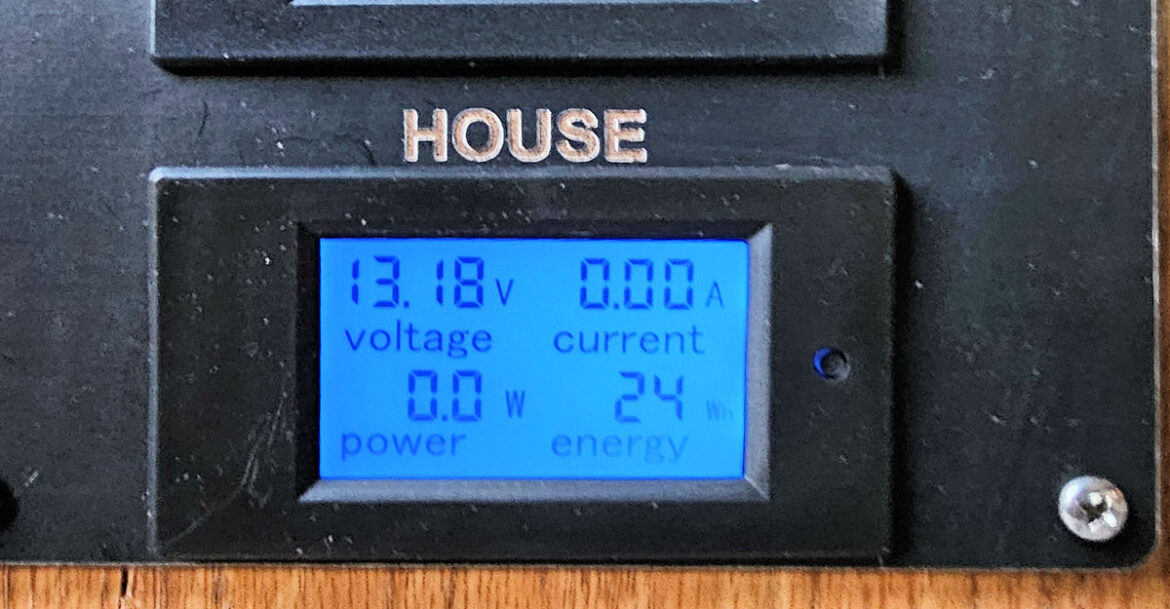
    Completed House Battery Display

    Completed House Battery Display

    This is the final display.  I made the display panel with labeling with a laser cutter out of scrap birch plywood.  Contact me if you would like one for yourself.

    I have not yet run the wire to the from of the chassis to attach to the engine battery.  This will wait until a little warmer, dryer weather.  It was, however, a fun and useful improvement to the rig itself and I look forward to many years of use.

    Shopping list:

    • Multi-meter (2)
    • 50′ of 16 gauge wire
    • inline auto fuse
    • crimp connectors
    December 9, 2024 0 comments
    0 FacebookTwitterPinterestEmail
  • Interior

    Soundproofing your Doghouse

    by Jon Glazer August 25, 2024
    by Jon Glazer August 25, 2024

    Older gas rigs have always had a problem with engine noise.  The engine is located within inches of the driver, after all.  The “cover” …

    Read more
    0 FacebookTwitterPinterestEmail
  • Miscellaneous

    Why post on MyBounder.com

    by Jon Glazer August 25, 2024
    by Jon Glazer August 25, 2024

    Thanks for considering becoming a contributor!  This site is dedicated to providing and sharing advice and experiences for all RV enthusiasts and the Fleetwood …

    Read more
    0 FacebookTwitterPinterestEmail
  • General Mechanical

    Slideout Failure!

    by Jon Glazer July 11, 2022
    by Jon Glazer July 11, 2022

    So it finally happened.  I had done some research on how to handle it when a slideout fails to retract but I still was …

    Read more
    2 FacebookTwitterPinterestEmail
  • General Mechanical

    OBDII (ODB2) Readers

    by Jon Glazer July 5, 2022
    by Jon Glazer July 5, 2022

    One of the most useful devices you can purchase for your rig is an OBDII reader.  This little gems plug into the computer port …

    Read more
    0 FacebookTwitterPinterestEmail
  • Suspension

    Greasing Front Wheel Bearings

    by Josh Bensadon June 7, 2022
    by Josh Bensadon June 7, 2022

    In this article, I will talk about my experience and learning on the Front Wheel Bearings. First, however, I recommend everyone read the safety …

    Read more
    0 FacebookTwitterPinterestEmail
  • General Mechanical

    Slideout Support Procedures….DON’T USE EM!

    by Jon Glazer May 10, 2022
    by Jon Glazer May 10, 2022

    There’s a number of threads out there about whether or not using slideout supports is a good idea.   This is my 2 cents and …

    Read more
    0 FacebookTwitterPinterestEmail
  • Electrical

    2004 Bounder 39Z Battery and Solar Installation

    by Joe Wilkinson May 9, 2022
    by Joe Wilkinson May 9, 2022

    I recently upgraded from a 1992 35J to a 2004 39Z. The previous owner had replaced the gas/electric RV refrigerator with a residential unit. …

    Read more
    0 FacebookTwitterPinterestEmail
  • 1
  • 2
  • 3
  • …
  • 7

Recent Posts

  • Battery Charge/Usage Meter
  • Soundproofing your Doghouse
  • Why post on MyBounder.com
  • Slideout Failure!
  • OBDII (ODB2) Readers

Recent Comments

  • Jon Glazer on Falling Cargo Doors?
  • Jon Glazer on Danger!: Adding Valve Extensions to Tires
  • Dave Carnley on Danger!: Adding Valve Extensions to Tires
  • Greg Harrison on Quick, Easy & Cheap Headlight Restoration
  • Eran Sadan on Replacing/Restoring your Headlights

Categories

  • Facebook

@2020 - 2025 - All Right Reserved


Back To Top
My Bounder
  • Home
  • Articles
    • View All Articles
    • Submit an Article
    • Help
  • F.A.Q.s
  • About
  • Contact
  • Resources
  • Register
  • Login