

In this article, I will talk a little about my experience and learning on the Power Gear RV Hydraulic Leveling Jacks.
First, however, I recommend everyone read the safety article.
https://mybounder.com/2022/02/09/safety-first/
I also want to let everyone know that I’m not responsible for anything you do. This article is for entertainment purposes only, do not try this yourself.
I am the 3rd owner of a 1999 36S Triton V10 Bounder. I bought it in April 2020.
When I bought my Bounder, the previous owner showed me how to add hydraulic fluid to the Leveling Jacks. I didn’t think much of it at the moment. I was rather overwhelmed with all the great features of this Bounder and trying to absorb as much information as possible. But it meant there was a problem. I noticed this problem after a summer in the RV, I found the RV would slowly lean to one side. The set level wasn’t being maintained!? Having a look at the jacks, I could see the red hydraulic fluid on the foot of the jack. It was leaking around the seal. The foot and bottom of the cylinder look wet.
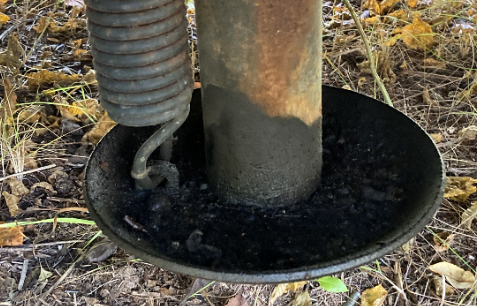
Leaking Hydraulic Jack
Hydraulic Jacks 101
Skipping the mechanical and physics details, here are the basics. Hydraulic fluid gets pumped into the cylinder of the jack under a lot of dangerously high pressure. The fluid then displaces (pushes) the rod out. The fluid doesn’t (or shouldn’t) leak or go anywhere else. The real critical part is where rod leaves the cylinder. There is a U shaped seal that goes all the way around the rod to keep all the fluid inside. It’s U shape helps press the rubber against the rod with the pressure, so it’s very important that this seal is good and installed in the correct direction.
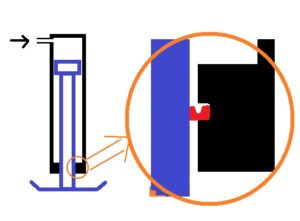
Simple cross section view of jack
In the illustration above, black is the cylinder, blue is the rod (with top cap and foot), red is the U shaped seal. Not shown in this simple drawing are 2 other O rings on top and bottom of the seal which all are on the “guide”. The guide is the lower part of the cylinder and is screwed into the cylinder. The top cap of the rod is needed to keep the rod in good alignment with (center of) the guide. The top cap slides up and down, rubbing against the inside of the cylinder, but doesn’t seal or impede the fluid. Also, not show is the spring necessary to pull the rod back up when the fluid is allowed to return to the reservoir. The real magic is the seal. In order for the seal to work so good, it needs a tight grip around the rod. There can be no room for the molecules of fluid to escape! The rubber fills small imperfections and the rod is a very smooth chrome finish.
How are “Jacks Down” detected?
Hydraulic fluid is pumped from the reservoir to push the jacks down, so when the jacks are up, all that fluid is in the reservoir. A floater switch in the reservoir monitors the full level. If the reservoir is not completely filled, it’s assumed that the fluid is in the jacks, hence “Jacks Down”. However, if fluid leaks out, then there will not be enough fluid to fill the reservoir and you’ll have a Jacks Down error. This can be fixed by adding more hydraulic fluid to the reservoir.
Filling the Reservoir
The reservoir on my Bounder is located in front of the right front tire, it’s best to have the wheels turned to the left to access it. There is a small fill plug on the top, videos on you tube will show it. You should clean around this plug before opening, you do not want dirt getting inside! To fill, it’s best to add 20″ of flexible clear vinyl tubing to a 1 Quart plastic bottle of transmission (hydraulic) fluid. Drill a hole into the top plastic cap just 1/64 smaller than the outside diameter of the tubing and squeeze the tubing through this hole and pull through 8″ to reach the bottom of the bottle. Now the bottle can be squeezed to push some fluid out, keep the tip of the tube inside the fill hole, but not too deep, you want it above the fluid so it will draw air back into the bottle for your next squeeze (otherwise, you’ll just suck back the fluid you squeezed in). When you’re done, remove this modified cap and tube, store in a clean zip lock bag, put another cap on the bottle and store it away until next time.
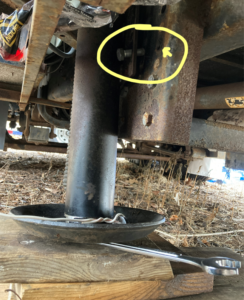
Removing a leaking jack
To remove the jack, first be sure the RV is in a safe place, not possible to roll. Be sure the Jacks are up (ie, no pressure in the hydraulic line). Clean around the hydraulic line, do not let dirt enter the system! Use the correct size wrench to unscrew the nut of the connector and pull away the line, don’t let it touch any dirt and put a plastic bag and elastic band over it to protect the line. Hydraulic fluid may squirt out of the port, put another plastic bag and elastic on it. Put blocks of wood under the foot to hold it’s weight (these jacks are heavy). Mark the location of the jack with some white paint or grease pencil or take a few pictures to remind you how to re-install. It’s a good idea to remove the spring to make the jack lighter (and possibly access all the bolts). Loosen the bolt on top of the spring all the way, this will release the spring tension. Once the tension has been released, remove the bolt on top of the cylinder to remove the spring. Work the spring out from the hook on the foot. Once the spring is removed, use a wire or some tie wraps to hold the foot up and into the cylinder. Remove the 6 bolts holding the jack to the frame. Be ready to steady the jack on top of the wood blocks when the last bolt is removed. Then carefully lift the whole jack to ascertain your control. If you have a good grip and strength, work it off the blocks and pull it out.
Opening the Jack
Power Gear released a very good guide on opening and servicing the jack. Jacks 82_l0352_seal_kit_replacement_manual_ This guide explains using heat to break the loctite seal, then all steps to reassemble, including the proper torque of all bolts. However, when I opened my jack, my seals didn’t look bad. No cuts or cracks. There was a couple of specs of rust on the chrome rod.
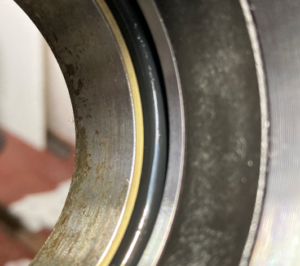
Inside rod guide, the seal.
Power Gear sells the whole guide with seals for $200, but I looked around and found a hydraulic shop in Toronto and just bought new seals for $15. However, the shop mechanic told me there was nothing wrong with my seals. This could only mean that some dirt or, in my case, a speck of rust got lodged between the seal and the rod. It does not take much break that tight seal. I sanded down the rod using 400 paper, then went up to 3,000 paper, wet sanding and finally a nice chrome polish and buffing wheel. It would have worked for a few months, but the shop mechanic told me the rust will return! So on his advice, I had him re-chrome the rod for about $260.
Reassembling the Jack
Before reassembly, everything was very carefully cleaned. The threads of the guide and inside the cylinder were cleaned with a wire brush on a Dremmel tool. To put the guide on the rod, hydraulic fluid is used to coat the rod and inside the guide. Then the guide is pressed and slowly twisted onto the rod until the seal stretches around the guide. Don’t try to put it on dry, it won’t work! A youtube video shows someone pounding the guide in place with a wood block! He needlessly wrecked the seal. Loctite was added to guide before screwing it into the cylinder as per the Power Gear guide. The foot was then once again wired to the cylinder and is now ready for re-installation!
Conclusion
I would like to tell you how my work went, but as of the writing of this article, it’s March and the weather is too cold and snowy to re-install.
Follow up/ reinstallation
Before reinstalling, I decided to follow the manual and replace the hydraulic ATF fluid. It was not hard, simply remove the top / fill bolt, place catch pan under, then remove the drain plug.

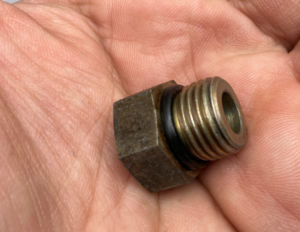
Inspect the drain plug, if the rubber ring moved down, push it back up.
Mounting the jack back into place was difficult due to the weight of the jack and working alone. I stacked up some wood to get it close, then put a wrench under the jack to server as a lever to lift it. I added 1 screw at the most easily accessible location and proceeded to lift and push the jack until the screw entered the bracket on the frame where I quickly with my 3rd hand put a nut on it…
Once that bolt was in place, it was easy to push the jack around to install the other 5 bolts with flat and lock washers. The first nut was removed and the washers were added (it was just too much to try adding washers and nut while lifting and pushing). All bolts were then torqued to 72 lb-ft as allowed for this size and strength of bolt.
With the jack back in place, the spring was tightened into place (and torqued per manual to 35 ft-lbs), hydraulic line reconnected and I just needed to blead the air out by simply bringing the jack down and up a few times.
Testing
This was the fun part… RV goes up, RV goes down. No leaks!
Resource Documents
Jacks 82_l0352_seal_kit_replacement_manual_
1 comment
Good article. I just replaced the seals in all of mine as they were 22 years old, leaked and don’t want to deal with it again at least for a few years. My advice is skip all of this and remove them yourself then take them to a hydraulic shop. I think it cost me $350 a pair for them to do including parts (before Biden inflation) and I did the R&R. One was scratched and they talked about the buffing and re-chrome etc but said it would only be a temp fix. They cut the end off and replaced the rod after making a new one on a lathe. That was an extra $200 for that one. Did it all for less than the price of a single new one from the company. It wasn’t that difficult to R&R. The only difficulty was getting to the nuts to loosen. You might want to replace in reverse meaning nut on the easy side to get too. Use a floor jack and 2nd person to lower it down once off. Not a fun job but I’ve done worse. Good luck if you attempt it. 99 Bounder 34V